State Authorization Reciprocity Agreement (SARA) refers to federal, state and professional licensing board regulations that impact educational activities offered across state lines and programs that lead to professional licensure or certification. Authorization requirements vary by state and program and may impact university operations. At Ohio State, we have a team dedicated to researching regulations, seeking and maintaining compliance, and communicating changes in authorization status.
State Authorization Reciprocity Agreement (SARA)
Ohio State has been a participating institution in SARA since 2015. Participation expands educational opportunities for Buckeyes, decreases institutional risk, and reduces costs associated with offering Ohio State programs nationally.
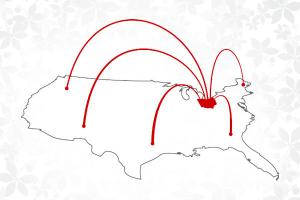
SARA is a national initiative that increases student access to distance education courses and programs while maintaining compliance with state regulations. Institutions participating in SARA can offer educational opportunities in all 49 SARA member states, the District of Columbia, the U.S. Virgin Islands and Puerto Rico without seeking individual approval in each state.
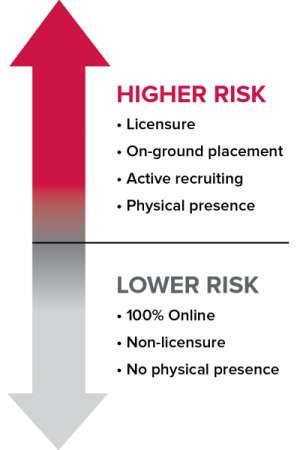
SARA establishes national standards for offering interstate education, but additional approvals may be required for the following out-of-state activities:
- Out-of-state field experiences in a licensed field
- Online licensure programs
- Placements of more than 10 students per program simultaneously at a placement facility
- Establishment of a physical location
- Requiring students to meet in person
Non-SARA States
California does not participate in SARA. The California Bureau of Private Postsecondary Education(opens in new window) does not regulate out-of-state public institutions. Therefore, Bureau approval for Ohio State to offer educational activities in California is not required.
Student Complaint Process
Ohio State Complaint Process
Students enrolled in an Ohio State course who have a complaint about a course or experience should follow Ohio State's complaint, grievance and appeal procedures(opens in new window).
Higher Learning Commission Complaint Process
Ohio State is accredited by the Higher Learning Commission(opens in new window). Students may submit a complaint about an HLC-accredited institution using the HLC complaint process(opens in new window).
SARA State Complaint Process
Students enrolled in a course that takes place outside of Ohio in a SARA member state(opens in new window) must first follow Ohio State’s procedures(opens in new window) for the resolution of complaints. If a student is not satisfied with the outcome of that process, a complaint involving allegations of dishonest or fraudulent activity, including the provision of false or misleading information, may be brought to the Ohio SARA portal entity(opens in new window). The SARA portal entity in the state where the student is located(opens in new window) will be notified that the complaint was received and may assist as needed. Resolution of the complaint by the Ohio SARA portal entity is final.
Examples of types of student complaints that may be brought to a SARA portal entity include, but are not limited to, complaints regarding accuracy of job placement data, tuition or fee information, accreditation, whether a program meets professional licensing requirements, or course transfer information. Grade appeals and student conduct appeals are not allowed under SARA.
State Authorization for Students
Professional Licensure & Certification Disclosures
For detailed information on whether your program is authorized to be offered online in your state, please visit the Ohio State Online State Authorization Page.

Ohio State makes every effort to ensure information about educational requirements for licensure or certification is current; however, state requirements may change. Separate from educational requirements, state licensure boards may require applicants to complete professional examinations, background checks, years of professional experience, residence requirements, jurisprudence exams, training, etc.
Ohio State academic programs are designed to prepare students to apply for licensure or certification in Ohio. Completion of an Ohio State program may not meet educational requirements for licensure or certification in a state other than Ohio.
If your program leads to a professional license or certification, authorization may be required from the state professional licensing board prior to beginning a clinical or field experience in that state. Check with your program’s internship or clinical coordinator prior to beginning an internship or field experience in another state.
Ohio State Licensure and Certification Programs Disclosures
Frequently Asked Questions
State Authorization
Q: Doesn’t state authorization only apply to online programs?
A: State authorization regulations apply to all for-credit out-of-state educational activities. That includes online courses and out-of-state field experiences, such as internships and clinicals.
Licensure program disclosures are required for all licensure programs, regardless of whether the program is offered on-campus or online.
Q: Why does it matter?
A: In order to offer educational opportunities to students outside Ohio, Ohio State must comply with state, federal and professional licensing board regulations. Federal regulations require an institution to be authorized in every state where a student is located in order to participate in Title IV federal financial aid programs.
Requiring authorization of distance education programs also protects students as consumers. Authorization ensures that a student is not investing in a program that is not legitimate or a program that does not lead to the license or certification the student was expecting.
Out-of-State Field Experiences
Q: What is a field experience?
A: A field experience is a learning experience in which a student applies previously learned theories or skills under the oversight of a supervisor or mentor. Examples include practical, student teaching, clinical placements or internships.
Q: Can I complete an on-ground field experience in a state other than Ohio?
A: Yes, Ohio State is authorized to place students in field experiences in all 50 states if your program is not in a licensed field. If your program is in a licensed field, like nursing or teaching, approval may be required from the professional licensure board in the state where the field experience takes place.
There are some limitations on the number of students that can be placed at a placement facility in SARA states(opens in new window), and Colorado has additional requirements (see below).
Your college will need to be informed of the state where you are completing a field experience.
Colorado On-Ground Field Experiences
Q: Can I complete a field experience in Colorado?
A: Prior to beginning a field experience at a Colorado facility, you should work with your internship coordinator to ensure that Colorado worker's compensation insurance requirements are met.
The Colorado Workers’ Compensation Act requires unpaid student interns to be covered by workers’ compensation insurance. Ohio State is not able to add students to its institutional workers’ compensation policy and students may not provide their own workers’ compensation insurance.
Q: Can I complete a field experience in Colorado?
A: It depends, the Colorado Workers' Compensation Act requires student interns to be covered by workers' compensation insurance. Ohio State is not able to add students to its institutional workers' compensation policy and the Colorado Department of Labor and Employment does not permit students to provide their own insurance.
Prior to beginning a field experience at a Colorado facility, you should work with your internship coordinator to ensure that you are able to complete your internship in Colorado.
Out-of-State Professional Licensure
Q: After completing a program that leads to licensure in Ohio, can I seek professional licensure in another state?
A: Professional licensure laws and regulations vary from state to state. An Ohio State program that leads to licensure or certification in Ohio may not meet educational requirements for licensure in another state. If you are planning to seek licensure or certification in a state outside of Ohio, please review the professional licensure disclosures (opens in new window)for your program.
International Online Students
Q: I live outside the United States. Can I enroll in an Ohio State online program?
A: Ohio State works to provide global access to its online programs. While the State Authorization Team carefully tracks issues related to international authorization, students should understand regulations and requirements related to online programs in their country of residence. This includes whether the country will recognize an online degree, if there are additional withholding taxes (in addition to tuition) in your country, and whether the program meets educational requirements for licensure or certification in your country.
Visit Ohio State Online(opens in new window) for more information about Ohio State's online programs, and contact a program to verify your eligibility.
Q: I am an international student enrolled in an on-campus program in Ohio. Can I enroll in online courses, or switch to a 100% online program while living in Ohio?
A: There are restrictions on the number of online credit hours that an international student may count toward a full course of study each semester. The Office of International Affairs can answer specific questions related to international students who are completing coursework while living in the United States.
State Authorization for Departments
State Authorization is responsible for seeking all necessary U.S. state and territory authorizations on behalf of the university. The team educates colleges and units about state authorization requirements and works with liaisons to collect reporting data and information required for authorization applications.
The role of State Authorization is not to approve or disapprove out-of-state activities. Rather, state authorization educates and works with colleges and units about the risks associated with operating in a state without authorization. The state authorization team meets with colleges to discuss enrollment plans and how they can help each student obtain an Ohio State University degree.
State Authorization also facilitates collection of out-of-state placement data for the annual NC-SARA (opens in new window)report. Colleges and units should continuously track this information and provide updated data to the state authorization team each spring.
Professional Licensure & Certification Disclosure Resources
Required Web Disclosures for Licensure and Certification Programs
U.S. Department of Education regulations and NC-SARA policies require institutions to disclose whether a program leading to a professional license or certification meets educational requirements for licensure or certification in all U.S. states. State Authorization maintains a central disclosure website, and units must share the following disclosure on the licensure program webpage maintained by the unit:
Online Licensure or Certification Programs
Ohio State academic programs are designed to prepare students to sit for applicable licensure or certification in Ohio. If you are planning to seek licensure or certification in a state outside of Ohio, please review the Ohio State Online map for your program before enrolling.
On-Campus Licensure or Certification Programs
Ohio State academic programs are designed to prepare students to sit for applicable licensure or certification in Ohio. If you are planning to seek licensure or certification in a state outside of Ohio, please review the professional licensure disclosures (opens in new window)for your program before enrolling.
Required Direct Disclosures for Licensure and Certification Programs
U.S. Department of Education regulations and NC-SARA policies require institutions to share professional licensure disclosures directly with prospective students who inquire about a program and students who enroll in a program that leads to licensure or certification. A direct disclosure can be shared via email in response to a prospective student inquiry and should be included in an acceptance email or welcome packet. Use the following templates to share direct disclosures:
Online Licensure or Certification Programs
Ohio State academic programs are designed to prepare students to apply for applicable licensure or certification in Ohio. If you plan to pursue licensure or certification in a state other than Ohio, please review state educational requirements for licensure and certification and state licensing board contact information at go.osu.edu/disclosures(opens in new window).
Ohio State makes every effort to ensure state licensure and certification information is current; however, state requirements may change. Please contact the applicable licensing board(s) in the state where you may want to pursue licensure or certification before beginning an academic program to verify whether a program meets educational requirements for licensure or certification in the state.
Ohio State generally does not offer online licensure or certification programs to students located in a state where the program does not meet educational requirements to apply for licensure or certification.
On-campus Licensure or Certification Programs
Ohio State academic programs are designed to prepare students to apply for applicable licensure or certification in Ohio. If you plan to pursue licensure or certification in a state other than Ohio, please review state educational requirements for licensure and certification and state licensing board contact information at go.osu.edu/onground(opens in new window).
Ohio State makes every effort to ensure state licensure and certification information is current; however, state requirements may change. Please contact the applicable licensing board(s) in the state where you may want to pursue licensure or certification before beginning an academic program to verify whether a program meets educational requirements for licensure or certification in the state.
Online & On-campus Licensure or Certification Programs
Program Does Not Meet Requirements
If the online licensure program website(opens in new window) or the on-campus licensure program website indicate that completion of the program does not meet educational requirements to apply for a license or certification in the state where a prospective student is located, include the following statement in the disclosure:
Completion of this program does not meet educational requirements to apply for licensure or certification in the state where you are currently located.
State Authorization Resources
Out-of-State Educational Activities Policy
The Out-of-State Educational Activities Policy(opens in new window) aims to bring Ohio State into compliance with state authorization regulations and positively impacts faculty, staff and students.
The policy defines state authorization roles and outlines compliance processes. By following compliance processes, units can ensure that an Ohio State degree will be recognized and that a student will be eligible to sit for licensure in another state.
Out-of-State Physical Presence Activity Resources
Colorado Workers’ Compensation Requirements - Unpaid Interns
The Colorado Workers’ Compensation Act(opens in new window) requires unpaid student interns to be covered by workers' compensation insurance. Specifically, Colorado Revised Statute 8-40-302 states:
(7) (b) If the student placed in an on-the-job training program does not receive any pay or remuneration from the employer, the educational institution sponsoring the student in the cooperative education or student internship program shall insure the student through the institution’s workers’ compensation and liability insurance or enter into negotiations with the employer for the purpose of arriving at a reasonable level of compensation to the employer for the employer’s expense of providing workers’ compensation and liability insurance while such student is participating in on-the-job training with said employer. This paragraph (b) shall not apply to a student teacher participating in a program authorized pursuant to article 62 of title 22, C.R.S.
(c) As used in this subsection (7), “cooperative education or student internship program” means a program sponsored by an educational institution in which a student is taught through a coordinated combination of specialized in-the-school instruction provided through an educational institution by qualified teachers and on-the-job training provided through a local business, agency, or organization or any governmental agency in cooperation with the educational institution.
Q: Can I complete a field experience in Colorado?
A: Prior to beginning a field experience at a Colorado facility, you should work with your internship coordinator and the state authorization team to ensure that Colorado worker's compensation insurance requirements are met.
The Colorado Workers’ Compensation Act requires unpaid student interns to be covered by workers’ compensation insurance. Ohio State is not able to add students to its institutional workers’ compensation policy and students may not provide their own workers’ compensation insurance.
State Authorization Advisory Committee (SAAC) Members
| Name | Title | Unit |
|---|---|---|
| Ericka Bruce | Program Manager — Education | College of Medicine |
| Gina Taff | College Registrar | College of Nursing |
| Nancy Dugan | Director — Career Development | College of Education and Human Ecology |
| Carri Gerber | Assistant Director — Academic Affairs | CFAES — ATI |
| Emily Hiatt | Center for Digital Learning and Innovation | College of Education and Human Ecology |
| Ryan Hunt | Associate Registrar | University Registrar |
| Bob Mick | Quality Program Coordination Consultant | College of Arts and Sciences |
| Vicki Miller | Associate Director — Compliance | Student Financial Aid |
| Lindy Weaver | Associate Professor, Clinical Director | School of Health and Rehabilitation Sciences |
| Paul North | Executive Director Graduate Programs | Fisher College of Business |
| Jeanne Osborne | Assistant Dean — Academic Affairs | CFAES |
| Ruby Pentsil-Bukari | SEVIS Analyist and Compliance Officer | Office of International Affairs |
| Richard Fajardo | Career Development Coordinator | CFAES |
| Leif Savard | Admissions Specialist | College of Social Work |
| Elizabeth Vu | Sr. Distance Learning Coordinator | College of Arts and Sciences |
| Jim Lingo | Student Services Manager, Office of Undergraduate Education | College of Education and Human Ecology |
Federal State Authorization Regulations
Program Integrity Rules - Misrepresentation (34 CFR 668.71(opens in new window) and 668.72(c)(opens in new window))
Federal State Authorization Regulation (34 CFR 600.9 and 668.43(opens in new window)), effective July 1, 2020
Frequently Asked Questions
SARA
Q: Is every state a member of SARA?
A: No. Currently, California is the only state that does not participate in SARA.
Q: Does Ohio State’s SARA participation automatically renew?
A: Ohio State is required to complete a renewal application every year to continue participation in SARA. Ohio State Online and eLearning pays the annual $14,800 SARA renewal fees on behalf of the institution.
Q: What if a program would like to place more than 10 students simultaneously at a facility?
A: If a program would like to place more than 10 students at a time at a facility in a SARA state, the state authorization team will reach out to the state SARA portal entity to request permission prior to the placement.
State agencies want to ensure that resources are available for all institutions placing students in the state. If a SARA portal entity doesn’t grant approval to place more than 10 students at a site, Ohio State could seek authorization from the state higher education regulator to move forward with the placement.
Q: When is Ohio State required to submit the annual report to NC-SARA?
A: Ohio State reports out-of-state student location information to NC-SARA between May 15 and June 15 each year. NC-SARA requires institutions to report the number of students participating in online programs and on-ground field experiences in each state during the previous year.
The state authorization team facilitates collection of student placement data in spring semester.
Q: Where can I learn more about NC-SARA requirements and policies?
A: Learn more at nc-sara.org(opens in new window) and review the NC-SARA Manual(opens in new window).
Marketing, Advertising and Recruiting
Q: Can a program advertise or recruit in a SARA state without additional approvals?
A: Yes. SARA covers advertising and recruiting activities in all SARA states. This includes recruitment at college fairs, and covers recruitment for traditional or online programs.
Advertising and recruiting materials must meet SARA guidelines for accuracy and truthfulness, including: accuracy of job placement data and information regarding tuition, fees and financial aid, admission requirements, professional licensing requirements, accreditation and transferability of course work to other institutions.
Q: What do I need to know about advertising or recruiting in non-SARA states or territories?
A: States that do not participate in SARA may have laws that restrict or prohibit advertising and recruiting. For example, some states may allow recruiting, but require the recruiting agent to be registered. Some states allow occasional recruiting, but prohibit consistent, organized recruiting.
Review the Physical Presence Activities by State document to learn more about advertising or recruiting in non-SARA states.
Q: What are college and unit responsibilities regarding out-of-state advertising, marketing and recruiting?
A: Colleges and units should be aware of and comply with state advertising and recruiting requirements and should contact the state authorization team with questions.
Out-of-State Placements and Internships
Q: Can students be placed in a SARA state without additional state approval?
A: Generally, yes. Up to ten students per program per facility may be placed simultaneously in a SARA state. For licensure programs, additional approval may be required from the state professional licensing board.
Contact the State Authorization for more information about licensure program placements or placing more than 10 students per program at a facility in a SARA state.
Q: What are college and unit responsibilities regarding out-of-state student placements?
A: Colleges and units should review placement restrictions in each state and consult with their state authorization liaison and the State Authorization prior to placing a student outside Ohio. Colleges and units must seek professional licensing board approval of a placement if necessary.
In addition, colleges and units are responsible for tracking the location of out-of-state student placements. The state authorization team collects this data for NC-SARA reporting in spring semester.
Out-of-State Professional Licensure
Q: Does SARA cover professional licensing board approvals in SARA member states?
A: No. Although SARA covers many out-of-state activities, it does not include professional licensing board approvals that may be required for out-of-state activities that are part of a licensure program.
Q: Which programs require professional licensing board approval?
A: Requirements vary from state to state. Some licensing boards require approval of pre-licensure and post-licensure programs. Other boards may require faculty to be licensed in the state where the student is located. Or boards may not regulate out-of-state programs at all.
Q: How does Ohio State make students aware of licensure requirements in other states?
A: State Authorization maintains professional licensure and certification disclosures for online programs(opens in new window) and on-campus programs on central disclosure websites. Colleges and units are required to link to state authorization's central disclosure website on the licensure or certification program webpage maintained by the college or unit and must provide direct email disclosures to students.
Q: What are college and unit responsibilities regarding out-of-state professional licensure?
A: Colleges and units must research and seek approval from the appropriate professional licensing board for a licensure program that includes an out-of-state activity, such as a clinical experience. Colleges or units should work with their state authorization liaison and the state authorization team to seek and maintain any required licensing board approvals.
Colleges and units should submit documentation of licensing board approvals to the state authorization team via email.
Q: Are there consequences for not disclosing professional licensing board status to students?
A: Possible consequences for non-compliance or misrepresentation of program status range from student lawsuits, loss of federal financial aid eligibility, fines, loss of accreditation and negative institutional reputation.
International Online Enrollment Risk Assessment
International Online Enrollment
Risk Assessment
Distance education regulations vary by country. It is the decision of the college or department whether to enroll an international online student. If your program decides to enroll an online student located outside the U.S., we request you advise the student to understand online program regulations in their country (see below).
Online International Enrollment Disclosure
If your program decides to enroll an international student in an online course or program, the state authorization team requests that you provide a written disclosure statement to the student. Sample disclosure notification:
A country may or may not regulate distance education provided to students in its jurisdiction and may or may not require foreign higher education institutions to comply with distance education regulations. At this time, The Ohio State University cannot guarantee that a program meets curriculum requirements or professional licensure requirements in your country.
International Online Enrollment Considerations
Foreign Degree Recognition
Some countries do not currently recognize credentials earned online.
Foreign Tax Requirements
Some countries seek to tax students and institutions directly. Students should be aware of potential taxes that may be charged in addition to tuition.
Countries Subject to U.S. Sanctions
Some countries may be subject to comprehensive or limited sanctions. Depending on the sanction category, providing educational services may be prohibited.
Specially Designated Nationals (SDN) List
Some individuals and companies owned, controlled by, or acting for or on behalf of certain countries cannot receive services from U.S. entities. Coursework and most university activities are exempt.
Internet Access Issues
Some countries (e.g., China) block or filter internet content. Use of a VPN in China is generally restricted and is not reliable.
Data Security and Privacy
Many countries have stronger data privacy laws than the U.S.